|
|
General Settings
This tab allows you to configure General settings of the Device.
Screen Layout of General Settings
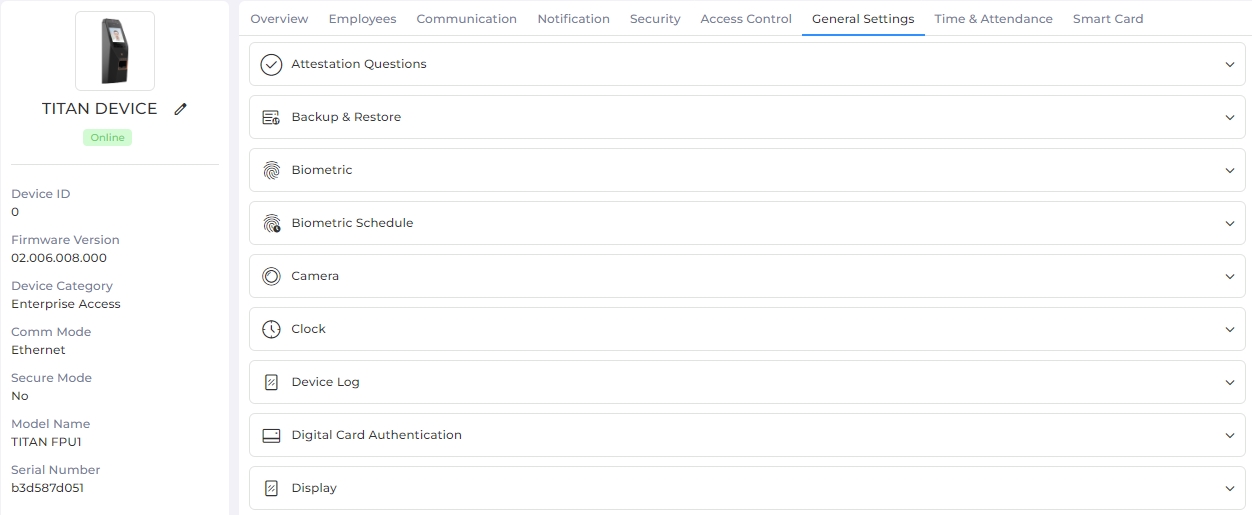
Field Description of General Settings
It contains various sections to save respective settings. Click on the particular section to expand it.
This feature allows IXM Device to do Attestation authentication for authenticated Employee / Visitor. IXM Device will validate Attestation for Employee / Visitor based on Authentication Mode, Questions & Answers and other parameters of configuration settings.
|
NOTE IXM Device will do Attestation Authentication after Mask and Thermal Authentication is done successfully.
|
Click on the switch to turn Attestation Questions feature ON or OFF. Following options will be enabled when the feature is turned ON -
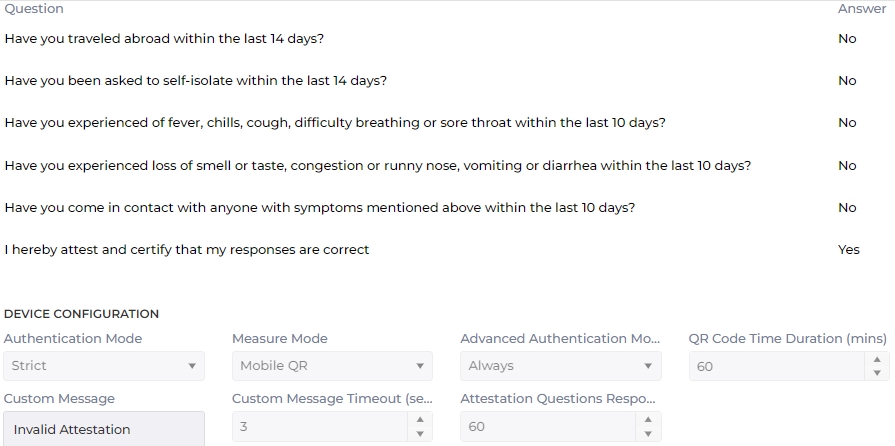
Question:
A list of Questions and their valid answers are displayed for your reference. These are the questions that will be asked by the Device and expected answers from the Employee for successful authentication.
|
NOTE Attestation Questions are added from IXM Health >> Settings >> Attestation Questions Settings section.
|
DEVICE CONFIGURATION
Authentication Mode:
Select the Authentication Mode from the dropdown list. If "Strict" mode is selected, the Device will deny access in case the response by Employee does not match with the required response to the Attestation question. If "Soft" mode is selected, the Device will grant access even if the Employee response does not match the expected response.
Measure Mode:
Click on the box to select Measure Mode from the dropdown list. By default, "Both" will be displayed as selected.
Select "Mobile QR" if the answers to the Attestation questions will be taken from Mobile QR. Select "Device" if the answers to the Attestation questions will be taken from the Device. Select "Both" if the answers to the Attestation questions can be taken from both Mobile QR and Device.
Advanced Authentication Mode:
Select the Advanced Authentication Mode from the dropdown list.
If "Intelligent" is chosen, IXM Device will not repeat Attestation for an Employee if it has already been done for that Employee. If "Always" is chosen, Device will always do Attestation even if it has already been done before.
QR Code Time Duration(mins):

This option is applicable only when Measure Mode is selected as "Mobile QR".
Enter the validation time for QR Card in minutes. Default duration is 60 minutes.
Custom Message:
Enter the notification message that should be displayed on the Device LCD in case of invalid response to Attestation question by the Employee. Default value is “Invalid Attestation”.
Custom Message Timeout(sec):
Enter the duration for which the Custom Message should be displayed on the Device LCD. It can be between 3 and 10.
Attestation Questions Response Timeout(sec):
Enter the seconds within which the response to the Attestation Question should be received from the Employee.
Send Wiegand
Click on the checkbox to select or deselect the option.
Enabling this feature will send Wiegand on invalid attestation received when authentication process is complete.
Duress Status
Click on the checkbox to select or deselect the option.
Enabling this feature allows Duress finger for the Employee during authentication process.
Capture Image
Click on the checkbox to select or deselect the option.
Enabling this feature will capture image and store it to transaction log on invalid attestation.
Log Attestation Info
Click on the checkbox to select or deselect the option.
Enabling this feature will log Attestation Response by Employees in Transaction log if Data Logging is enabled on IXM Device.
VISITOR ATTESTATION QUESTIONS
Enable Attestation Questions for Visitors
Click on the checkbox to select or deselect the option.
Enabling this feature will display Attestation Questions to the Visitors also.
Custom Message:
Enter the notification message that should be displayed on the Device LCD in case of valid response is provided by the Visitor to Attestation question. Default value is "Welcome Visitor".
Custom Message Timeout(sec):
Enter the time duration for which the Visitor's Custom Message should be displayed on the Device LCD. It can be between 3 and 10.
Attestation Questions Response Timeout(sec):
Enter the seconds within which the response to the Attestation Question should be received from the Visitor.
Once entered, click on APPLY button to save and apply the settings.
Click on RESET button to restore the original settings.
IXM WEB allows users to download Backup files & Restore it with “ixmbkp.bki” file (default file name).
|
NOTE Users will only be able to take back up and restore if the Device is online.
|
The process comprises of three parts:
-
Backup of Device
-
Restore
-
Backup of IXM WEB Database
Following options will be displayed -

DEVICE OPTIONS
All
Click on the checkbox to select or deselect the option. Selecting this option will automatically select all the below mentioned options.
Config Parameter
Click on the checkbox to select or deselect the option. Selecting this option if you want to take backup of Config Parameters.
Transaction Logs
Click on the checkbox to select or deselect the option. Selecting this option if you want to take backup of Transaction Logs.
Translate
Click on the checkbox to select or deselect the option. Selecting this option if you want to take backup of Translate.
Audio
Click on the checkbox to select or deselect the option. Selecting this option if you want to take backup of Audio.
Images
Click on the checkbox to select or deselect the option. Selecting this option if you want to take backup of Images.
Employee
Click on the checkbox to select or deselect the option. Selecting this option if you want to take backup of Employees.

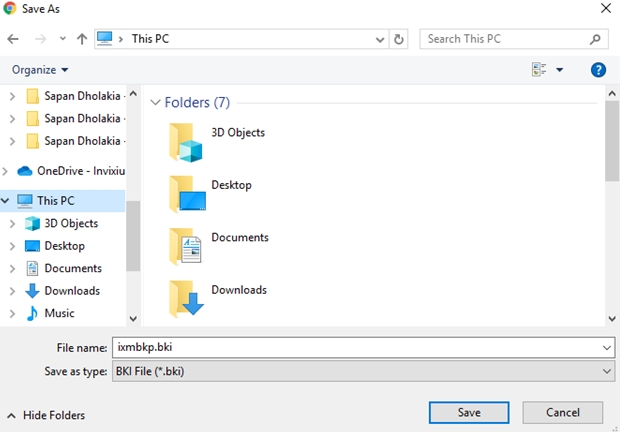
Click on Restore button to restore previously backed up files. The application will ask for confirmation as follows -
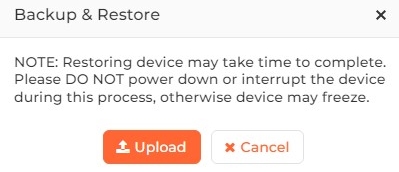
Click on Upload button to select the backup file from its path. Click on Cancel button to discard the action.
Upon process completion, a confirmation message will be displayed.

|
|
Biometric Configuration is configured in IXM WEB’s Biometric Settings. The following sections can be changed:
-
Security Level Fingerprints.
-
Device Mode.
-
Access Rule.
-
Security Settings.
Using these options, users can troubleshoot biometric issues and easily identify the current biometric configuration on the Device.
Following options will be displayed -
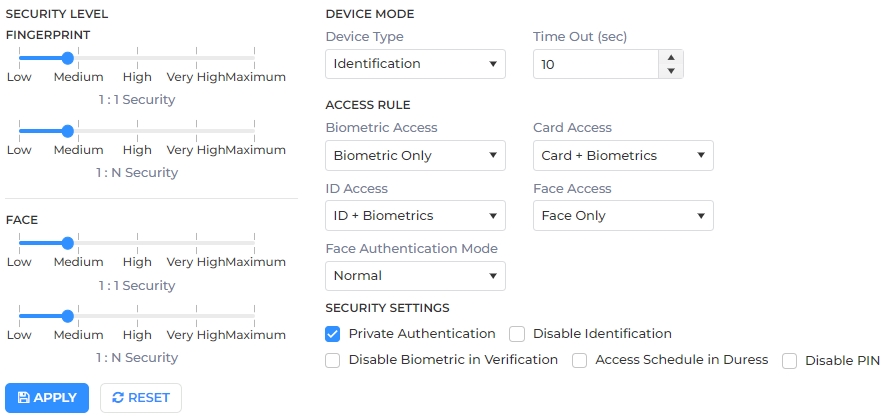
SECURITY LEVEL FINGERPRINT
1:1 Security:
1:1 Security operates in Verification mode. Accuracy of user verification can be set to “Low”, “Medium”, “High”, of “Very High”. “Medium” is the default accuracy.
1:N Security:
1:N Security operates in Identification mode. Accuracy of user identification can be set to “Low”, “Medium”, “High”, of “Very High”. “Medium” is the default accuracy.
FACE
|
NOTE Face Level Security options will be available when users selects a TITAN or TOUCH Face Device.
|
1:1 Security:
1:1 Security operates in Verification mode. Accuracy of user verification can be set to “Low”, “Medium”, “High”, of “Very High”. “Medium” is the default accuracy.
1:N Security:
1:N Security operates in Identification mode. Accuracy of user identification can be set to “Low”, “Medium”, “High”, of “Very High”. “Medium” is the default accuracy.
DEVICE MODE
Device Type:
Select either "Verification" or "Identification" from the dropdown list.
Selecting "Verification" will enable card-only authentication.
In "Identification" mode, the Device will use multiple authentication modes based on its model.
Once selected, the application will ask for confirmation as follows -
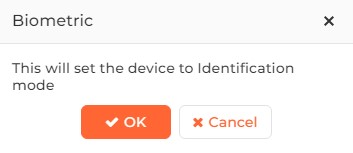
Click on OK button to continue or Cancel button to discard the action.
Time Out (Sec):
Edit the amount of time before authentication times out between 3 and 60 seconds. By default, authentication times out after 10 seconds.
Spoof Level:

This option is available only for Lumidigm Sensor supported Devices.
You can set Spoof Level settings to prevent fake finger authentication. The following levels are available for Spoof Level settings:
Disable
Low
Medium
High
Very High
ACCESS RULE
Biometric Access Rule:
You can alter the Device’s Biometric Access Rules by selecting it from the dropdown list. The default option is "Biometric Only". Following options will be displayed -
Biometric Only
Biometric + PIN (depends upon the Device type)
Biometric + Face (available only for TITAN & TOUCH 2 Face)
Biometric + Face + PIN (available only for TITAN & TOUCH 2 Face)
Card Access:
You can select the Device’s Card Access Rule from one of the following. The default Card Access Rule is "Card + Biometrics". Followings options will be displayed -
Card Only
Card + Biometrics
Card + PIN
Card + Biometric + PIN (depends upon Device type)
Card + Face + Finger (available only for TITAN & TOUCH 2 Face)
Card + Face + PIN (available only for TITAN & TOUCH 2 Face)
Card + Face + Finger + PIN (available only for TITAN & TOUCH 2 Face)
ID Access:

This option is available only for TITAN, TOUCH 2, and MERGE series Devices.
You can select one of the following options from the Device ID Access Rule. The default ID Access Rule is “ID Only”.
ID Only
ID + Biometrics
ID + PIN
ID + Biometrics + Pin (depends upon device type)
ID + Face (available only for the TITAN & TOUCH 2 Face)
ID + Face + Finger (available only for the TITAN & TOUCH 2 Face)
ID + Face + PIN (available only for the TITAN & TOUCH 2 Face)
ID + Face + Finger + PIN (available only for the TITAN & TOUCH 2 Face)
Face Access:

This option is available only for TITAN, and TOUCH 2 Face Devices.
You can select one of the following options for the Device’s Face Access Rule. The default Face Access Rule is “Face Only”:
Face Only
Face + Finger
Face + PIN
Face + Finger + PIN
Face Authentication Mode:

This option is available only for TITAN, and TOUCH 2 Face Devices.
Select either "Fast" or "Normal" from the dropdown list.
SECURITY SETTINGS
Private Authentication
Click on the checkbox to select or deselect the option.
Users can configure the Access Rule at User Level and Global (device) Level. Enabling Private Authentication means that user-based access rules will have priority during the authentication process. By disabling this setting, the Global Level access rule will overwrite the User Level access rule. This option is enabled by default.
Disable Biometrics in Verification
Click on the checkbox to select or deselect the option.
Biometric verification will be done only if this setting is disabled. If biometrics are disabled, then during verification, the Device will not ask for a finger. All other credentials will be asked as per the access rule set by the user. By default, this setting is disabled.
Access Schedule in Duress
Click on the checkbox to select or deselect the option.
If an access schedule is applied on the Device and a user authenticates with their pre-programmed duress credentials, access will be granted regardless of the access schedule. By default, the Access Schedule in Duress setting is disabled.
Disable PIN
Click on the checkbox to select or deselect the option.
It describes PIN status at the time of authentication. The PIN will be asked or bypassed as per the status set. If the PIN is disabled then during authentication, the Device will not ask for the PIN. All other credentials will be asked as per the aces rule set for the user.
Once entered, click on APPLY button to save and apply the settings.
Click on RESET button to restore the original settings.
|
|
Biometric schedules are used when the Device is in verification mode and it is no longer required to verify the user with fingerprint during specific times. During these times, the users will not be required to authorize themselves using biometrics (fingerprints) and will be able to enter the area without any biometric access control, using only card or PIN or neither (if required).
Click on the switch to turn Biometric Schedule feature ON or OFF. Following options will be enabled when the feature is turned ON -

Click on EDIT button. This will open a Biometric schedule selection window. Select days and times when fingerprint authorization is not required.
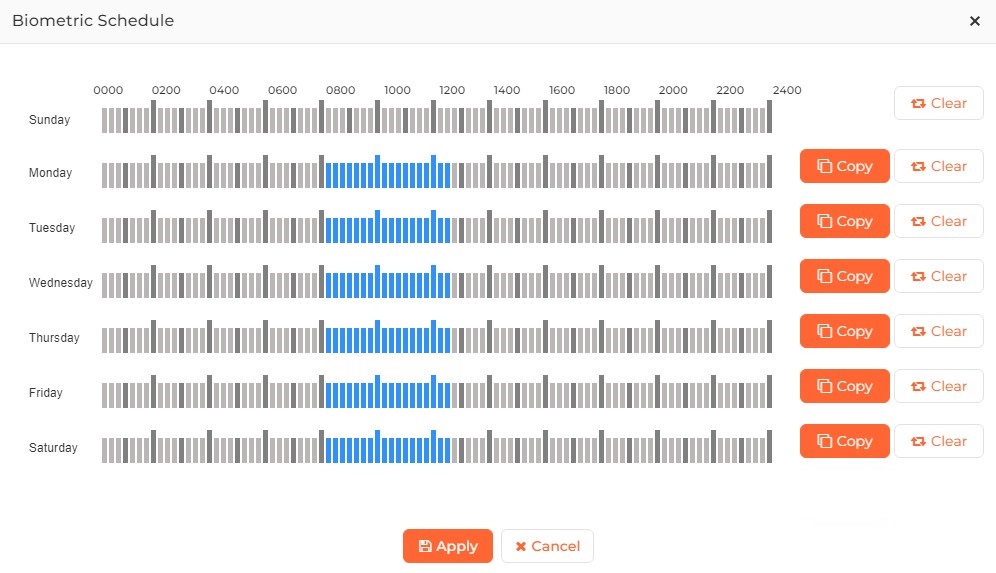
Click on Copy button to use the same schedule duration set for the previous day. i.e. If on Monday the schedule is created for 09:00 AM to 05 PM, the user can click Copy to repeat the same schedule duration for Tuesday.
Click on Clear button to clear the schedule.
Once done, click on Apply button to apply the settings on the Device. Click on Cancel button to discard the action.
Camera settings allow users to detect faces for the authentication process by turning Face Detection ON. It also provides an option to download the captured image of the detected face automatically in the Transaction Log. In dark environments, camera settings provide an option to set the LED flash on/off.
For TITAN and TFACE, users can activate Multiple Face detection, Live Face Detection, and Liveness Level. It also provides an option to turn ON Auto Exposure on faces. During face detection, users can change the volume of the capturing sound using the camera settings.
Following options will be displayed -

GENERAL SETTINGS
Flash:
Based on the brightness of the room, you can set the LED flashlight to one of the following:
OFF
ON
Auto
In the case of a perpetually dark room, users can select “ON” for Flash, to ensure that the face is captured properly. For rooms that have varying levels of darkness throughout the day, “Auto” should be selected.
Liveness Level:
Based on this security level the Device will detect liveness. You can set the Liveness Level to one of the following:
Low
Medium
High
Very High
Shortcut Icons
Click on the checkbox to select or deselect the option.
Enabling Shortcut Icons will display the phone dialer, home screen, and the verify user icons on the LCD.
Auto Log Media
Click on the checkbox to select or deselect the option.
Enabling Auto Log Media will send an image of the face detected during authentication to the transaction logs automatically.
Face Detection
Click on the checkbox to select or deselect the option.
Select the option to ensure that during authentication, users are asked to show their faces properly.
Face Detection on Authentication Fail
Click on the checkbox to select or deselect the option.
Enabling this option ensures that during authentication failure, users are asked to show their face properly.
FACE CAPTURE SETTINGS
Face Capture Sound:
You can set the value for face capture audio volume.
Preview Resume Time (sec):
Enter the duration (in seconds) after which the Camera should resume once authentication using other biometric options, such as fingerprint or card is done. The default duration for resuming preview is 5 seconds.
Capture Request Wait Time (msec):
Enter the duration (in milliseconds) that the camera should wait before resuming after the face is captured. The default wait time is 600 msec.
Auto Face Identification
Click on the checkbox to select or deselect the option.
Enabling Auto Identification will always keep the camera turned on.
Face Capture Guides
Click on the checkbox to select or deselect the option.
Enabling Face Capture Guides will display an orange color box on the camera to indicate users need to show their faces within that box only.
Multiple Face Detection
Click on the checkbox to select or deselect the option.
Enabling Multiple Face Detection will grant access to the user whose face is closest to the camera. If Multiple Face detection is OFF, the Device will not grant access if there are multiple faces in the frame.
Live Face Detection
Click on the checkbox to select or deselect the option.
Enabling Live Face Detection will ensure that only a LIVE face is detected and prevents spoof (photograph) face detection.
Capture on Touch
Click on the checkbox to select or deselect the option.
Enabling Capture on Touch will ensure that the camera captures the face on touch.
Auto Focus with Presence Detect
Click on the checkbox to select or deselect the option.
Enabling Auto Focus with Presence Detect will ensure that the camera auto-focuses as soon as the presence of a face is detected on it.
Once entered, click on APPLY button to save and apply the settings.
Click on RESET button to restore the original settings.
Click on RESET CAMERA button to reset the camera.
Click on TEST CAMERA button to test the camera
This feature allows user to set date, time and time zone on Device. It supports time zones which are supported by Android. Android automatically takes care of daylight saving.
Following options will be displayed -
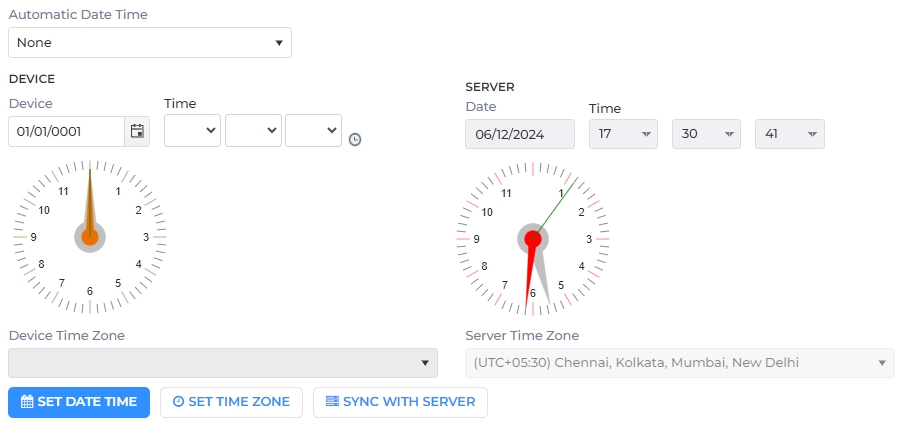
Automatic Date Time:
Click on the box to select the Automatic Date Time on the Device from the dropdown list.
Select "None" to manually set the Date and Time on the Device.
Select "NTP" to set Date and Time from NTP URL. You can enter the NTP URL from where the Device will automatically set the Date and Time.
By selecting "Sync with IXM WEB Server", the Device will automatically set the Date and Time by syncing with the IXM WEB Server URL.
DEVICE

|
This option will be enabled only when Automatic Date Time is selected as "None". |
Date:
Enter the date or select it by using the calender icon.
Time:
Specify Time by entering or selecting hours, minutes and seconds.
The application will display the selected Time in analog mode also.
Device Time zone:
Click on the box to select the Time Zone from the dropdown list.
SERVER

|
This option will display date and time on Server and will remain disabled. |
Date:
Displays the Date on IXM WEB Server for your information. You can not change it.
Time:
Displays the Time on IXM WEB Server for your information. You can not change it.
The application will display the Time in analog mode also.
ServerTime zone:
Displays the Time Zone on IXM WEB Server for your information. You can not change it.
Click on SET DATE TIME button to save the Device Date and Time.
Click on SET TIME ZONE button to save the Device Time Zone.
Click on SYNC WITH SERVER button to sync the Device Date, Time and Zone with IXM WEB Server Date, Time and Zone.
As the name suggests device debug logs are used for debugging device-related issues, should any arise. These logs help the Invixium Support team in troubleshooting complex device-related bugs and issues and should ideally be enabled for quick turnaround times to device issues.
Following options will be displayed -

Capture Device Logs
Click on the checkbox to enable Capture Device Logs.
Once entered, click on APPLY button to save and apply the settings.
Click on DOWNLOAD button to initialize the process to download the device log file. Following screen will be displayed -
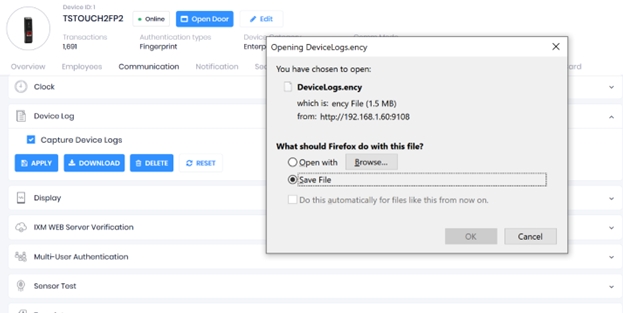
Select Save File and click on OK button to store the device log file on your machine.
Click on DELETE button to delete the log file permanently.
Click on RESET button to reset Device Log settings permanently.
|
NOTE You can also enable the Device Debug Logs from the LCD. Read more...
|
This feature allows to set Digital Card Authentication on IXM Devices. Once this feature is enabled, IXM Devices (TITAN and TFACE) will be able to Read Digital Card using Bluetooth and will do Verification same as it does for any Physical Card.
Click on the switch to turn Digital Card Authentication feature ON or OFF. Following options will be enabled when the feature is turned ON -
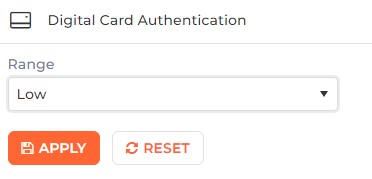
Range:
Select the Bluetooth range as Low, Medium, High, or Very High from the dropdown list.
Once entered, click on APPLY button to save and apply the settings.
Click on RESET button to restore the original settings.
This feature allows users to manage and configure display settings like setting time, managing background image file(s), turning the display ON/OFF, and managing photos on TITAN, TFACE, TOUCH 2 and MERGE 2.
The following options will be displayed -
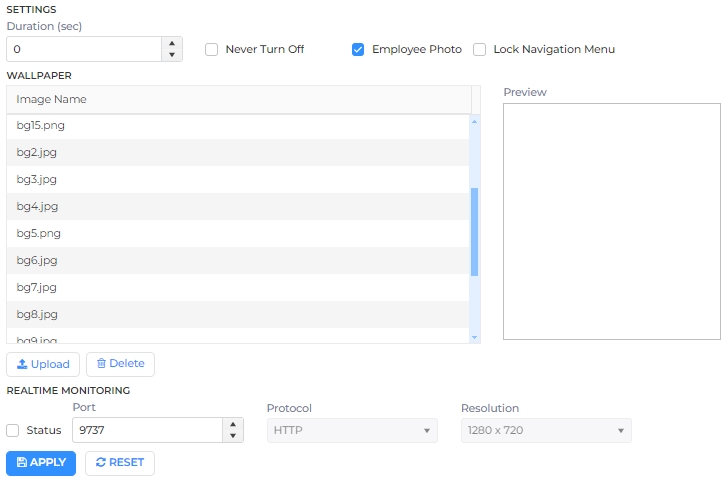
SETTINGS
Duration:
The option provides the flexibility to increase or decrease the duration of the image display time on the LCD.
Never Turn Off
Click on the checkbox to enable or disable Never Turn Off feature.
Enabling this feature will display the image on the LCD for an infinite duration.
Employee Photo
Click on the checkbox to enable or disable this feature.
By enabling this feature, the IXM Device will show the user’s photo if it is set at the time of enrollment during the identification and verification process.
If this feature is disabled, the user’s photo will not be displayed on the Device LCD during identification and verification processes.
WALLPAPER
Select the Wallpaper for the Device LCD by clicking on the respective file in the list. Preview of the selected image will be shown on the right side.
Click on Upload button to upload a new image on the Device and the progress bar will be displayed.
Once entered, click on APPLY button to save and apply the settings.
Click on RESET button to restore the original settings.
|
|
This feature allows verifying the details from IXM WEB instead of storing the same on the Device.
By enabling IXM WEB Server Verification feature, while showing card on the Device, the user record details are fetched from the IXM WEB Database directly. This feature is quite beneficial if the user capacity on Device is less than number of Employees in the organization.
Following options are displayed -
Status
Click on the checkbox to enable or disable this feature.
|
NOTE IXM WEB Server URL is configured in Device >> Communication >> IXM WEB Server section.
|
Once entered, click on APPLY button to save and apply the settings.
Click on RESET button to restore the original settings.
Invixium’s new facial recognition solution can quickly identify employees and visitors for mask-based access control or workforce management.
Click on the switch to turn Mask Authentication Settings feature ON or OFF. Following options will be enabled when the feature is turned ON -
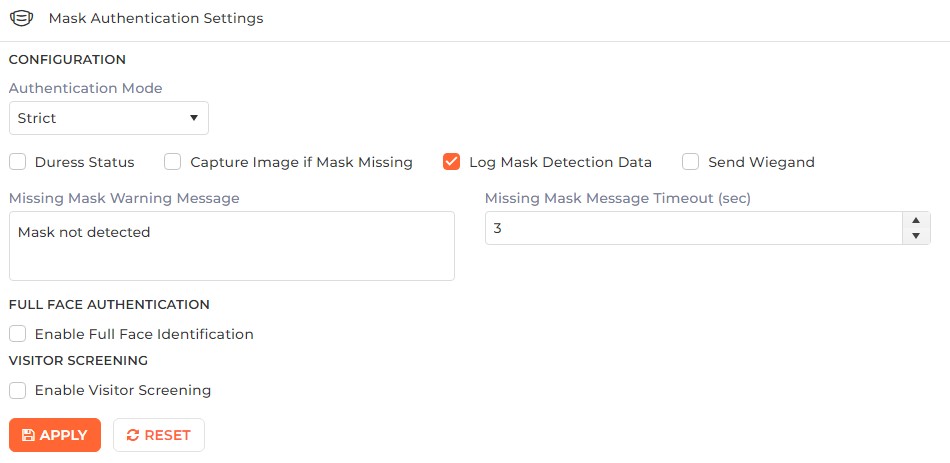
CONFIGURATION
Authentication Mode:
Click on the box to select mode from the dropdown list. There are two options for the mode of authentication used to control the access workflow if a mask is not detected. The default mode of authentication is strict.
Soft
Access will be granted to the user even if a mask is not detected.
Strict
Access will be denied if a mask is not detected.
Duress Status
Click on the checkbox to enable or disable this feature.
Enabling this setting would allow access to the user if a mask is not detected if the user authenticates using their pre-programmed duress finger. The default setting is disabled.
Capture Image if Mask Missing
Click on the checkbox to enable or disable this feature.
Enable this setting to capture an image of the user if a mask is not detected. By default, this setting is disabled. The same image will be used for sending email notifications from IXM WEB.
Log Mask Detection Data
Click on the checkbox to enable or disable this feature.
Enabling this setting tracks mask detection in the transaction log. By default, this setting is enabled. You can disable this feature using IXM WEB only, not on the device’s LCD.
Send Wiegand
Click on the checkbox to enable or disable this feature.

This setting will be visible only in “Strict” authentication mode.
Enabling this setting will generate Wiegand whenever a mask is not detected in the authentication process.
Missing Mask Warning Message:
Set a message to display after a mask is not detected. The message can be up to 50 characters.
Missing Mask Warning Message Timeout (sec):
Configure the length of time that the mask is not detected message stays on the screen. The default time is 3 seconds.
FULL FACE AUTHENTICATION
Enable Full Face Identification
Click on the checkbox to enable or disable this feature.
Invixium Periocular algorithms can achieve accurate identification using only the eye and eyebrow regions of the face. Full face identification is used to get more accuracy and capture a user’s face without a mask in the image log. By default this setting is disabled.
Remove Mask Display Message:

This option will be displayed when Enable Full Face Identification is enabled.
Set a message to display after a mask is detected when Full Face Identification is enabled. Messages can be up to 50 characters in length.
Remove Mask Display Message Time (sec):

This option will be displayed when Enable Full Face Identification is enabled.
Configure the length of time that the mask is detected message stays on the screen. The default time is 3 seconds.
VISITOR SCREENING
Enable Visitor Screening
Click on the checkbox to enable or disable this feature.
Enable this setting to start screening visitors for masks. By default, this field is disabled.
Visitor Screening Message:

This option will be displayed when Enable Visitor Screening is enabled.
Set a message that will be displayed when a visitor is showing their face. Messages can be up to 50 characters.
Visitor Mask Missing Warning Message:

This option will be displayed when Enable Visitor Screening is enabled.
Set a message that will be displayed when a visitor is screened without a mask. Messages can be up to 50 characters in length.
Visitor Message Display Time(sec):

This option will be displayed when Enable Visitor Screening is enabled.
Configure the length of time that the visitor screening message stays on the screen. The default time is 3 seconds.
Once entered, click on APPLY button to save and apply the settings.
Click on RESET button to restore the original settings.
|
NOTE You can also configure Mask Authentication Settings on the Device Read more...
|
This feature will enable end-users to run the Device in “Two-Man Rule” mode which is a control mechanism designed to achieve a high level of security, especially for critical materials or operations. The presence of two authorized persons is always required for all access and actions.
IXM Devices support a maximum of three authorizations to gain access, along with the following types of Multi-User Authentication:
-
Any: – Any user enrolled on the device can verify
-
Employee: – Specific employees can verify
Click on the switch to turn Multi-User Authentication Settings feature ON or OFF. Following options will be enabled when the feature is turned ON -

Wait Time(sec):
Enter the “Wait Time”, which indicates how much time the user will get between multiple-user authentication modes.
For the first Employee, click on the box to select either "Any” or “Employee” from the dropdown list.
Upon selection of "Employee", click on View button and a list of Employees which are synced to the Device will be displayed.
Click on the + icon (add user) on the user that has to be added for multi-user authentication on the Device.
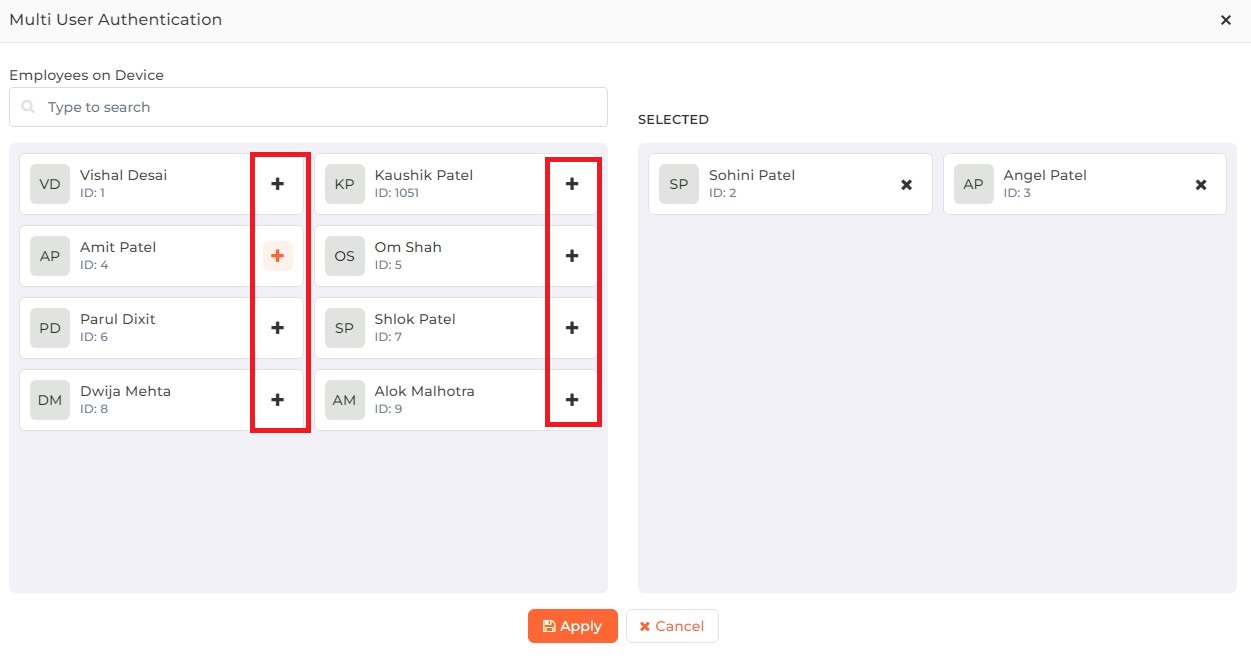
For the second Employee, follow the same steps as the first one and make required changes.
For the third Employee, by default, the option will be “None”. Click on the box to select either "Any” or “Employee” from the dropdown list. This selection box will remain disabled until the user selects any other option than “None”.
Once entered, click on APPLY button to save and apply the settings.
Click on RESET button to restore the original settings.
This feature allows Employees to use QR Code as authentication option. IXM Device will be able to read QR Code as a Card and will do verification same as it does for any Card. IXM Device is also capable to read generated QR Code, so that it can be useful for assignment of QR Code number to the Employee.
IXM Device treats this QR Card as any other Card. This allows Employee to use all the Card related Access Rules like Card + Face , Card + Bio etc. for Verification Process.
Click on the switch to turn QR-Code Authentication Settings feature ON or OFF. Following options will be enabled when the feature is turned ON -
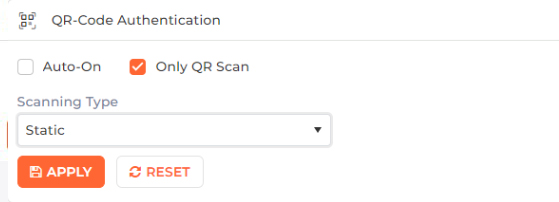
Auto-On
Click on the checkbox to enable or disable this feature.
Enabling this feature will open the camera automatically to scan the QR-Code.
Only QR Scan
Click on the checkbox to enable or disable this feature.
Enabling this feature will only scan the QR Code.
Scanning Type:
Click on the box to select the Type from the dropdown box.
-
Normal
Only Normal QR Card will be scanned on TITAN / TFACE LCD by camera for Employee authentication.
-
Dynamic
Only Dynamic QR Card (generated by IXM Mobile APP) will be scanned on TITAN / TFACE LCD by camera for user authentication. Other QR will not work.
-
Both
Above both QR Card will be scanned on TITAN / TFACE LCD by camera for user authentication.
Once entered, click on APPLY button to save and apply the settings.
Click on RESET button to restore the original settings.
This feature allows users to test the Device Sensor and also provides information related to the finger print images taken on that Device.
Following options will be displayed -
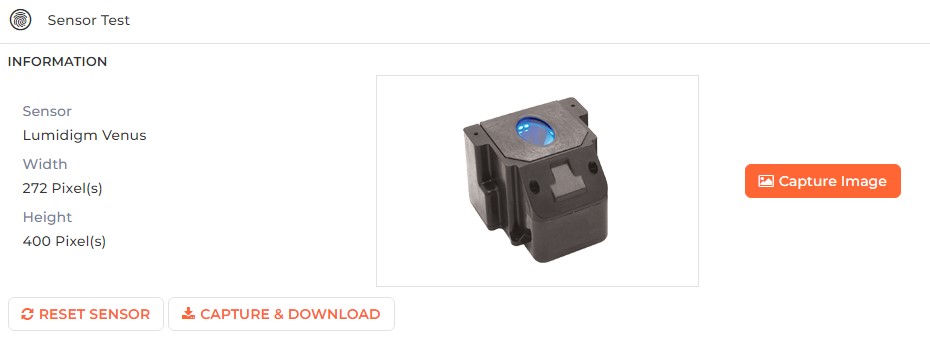
The application will display the image of the Sensor belonging to the selected Device. Click on Capture Image button next to the Sensor image to capture the fingerprint image.
It will ask to place finger on the Device Sensor. Once the Employee places the finger, it automatically captures the finger print from the Sensor and displays it on the screen as follows -

Click on RESET SENSOR button to reset the Device Sensor. This is particularly helpful when the Sensor is in a hang position or malfunctioning or having some problem with fingerprint capture.
Video settings allow users to configure video surveillance and video calling by turning on the feature. These settings also provide options to set specific resolutions over specific protocols. Users can also perform video surveillance over ports by changing their values.
Click on the switch to turn Video Surveillance feature ON or OFF. Following options will be enabled when the feature is turned ON -

URL:
Automatically displays the IP Address of the Device.
Frames per second:
It denotes the typical frequency at which consecutive images called frames appear on a display. The term applies equally to film and video cameras, computer graphics, and motion capture systems. The Device by default supports 15 frames per second.
Format:
The Device by default supports MJPEG video format when surveillance is on.
Port:
It denotes the Device port on which video surveillance will work. The default port number is 9736.
Protocol:
Click on the box to select the Protocol from the dropdown list. The Device supports HTTP and RSTP protocols.
-
HTTP
Users can use a browser to watch a video stream.
-
RTSP
Users can use third-party software that supports Real Time Streaming Protocol (RTSP).
Resolution:
On the TOUCH 2 Device, only 320 x 240 and 640 x 480 resolution is supported. On TITAN Device 768 x 1024 resolution is supported. On the TFACE Device, 768 x 1024 resolution is supported.
Once entered, click on APPLY button to save and apply the settings.
Click on RESET button to restore the original settings.
This feature allows users to answer the Attestation Questions by speaking.
Click on the switch to turn Voice Command feature ON or OFF. Following options will be enabled when the feature is turned ON -

Attestation Questions
Click on the checkbox to enable or disable this feature.
Enabling this feature will allow Employees to answer the Attestation Questions through their voice. The feature is enabled by default.
Action No:
Enter various forms of "No" to recognize Employee's answer as "No" to a particular question.
Action Yes:
Enter various forms of "Yes" to recognize Employee's answer as "Yes" to a particular question.
Once entered, click on APPLY button to save and apply the settings.
Click on RESET button to restore the original settings.
